本文开放源码。之前的文章说了如何在k8s构建apollo及用Ingress配置了portal页面,需要了解的朋友可以打开文章中心或者跳到下面观看:
http://www.yixao.com/share/19725.html
本文将演示如何集成配置中心apollo config的ingress及创建一个springboot项目调用k8s里面的apollo,获取配置中心的值,切换环境,并在apollo的portal页面进行增加、修改、回滚等操作。
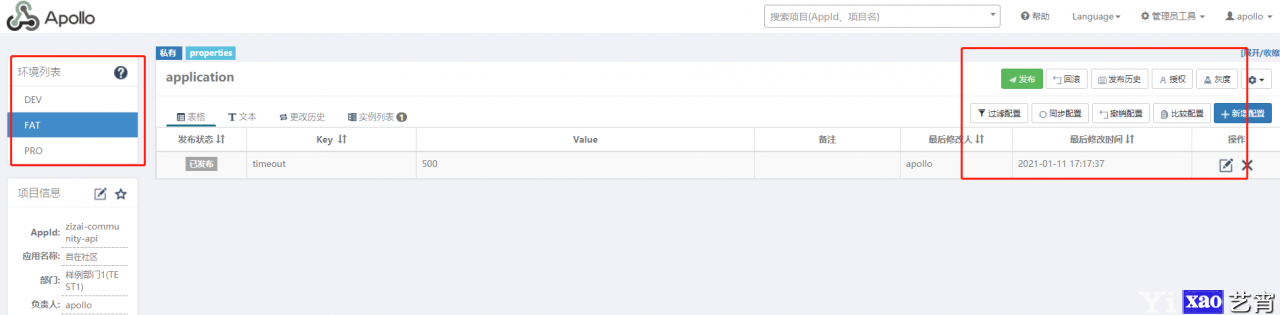

apollo操作页面
一、创建客户端要连接的config服务的Ingress文件
因我们的apollo集群是部署在k8s里面的,所以我们访问里面的服务需要用Ingress来映射。ingress是一个API对象,ingress通过http或https暴露集群内部service,依靠ingress-controller给service提供外部URL、负载均衡、SSL/TLS能力以及基于host的反向代理。
创建了3个环境,3个环境对应的ingress文件为:
apiVersion: extensions/v1beta1
kind: Ingress
metadata:
  name: zizai-apollo-client-dev
  namespace: zizai

spec:
  rules:
    - host: zizai-apollo-client-dev.test.thinkinpower.net
      http:
        paths:
          - path: /
            backend:
              serviceName: service-apollo-meta-server-dev
              servicePort: 8080

---
apiVersion: extensions/v1beta1
kind: Ingress
metadata:
  name: zizai-apollo-client-test
  namespace: zizai

spec:
  rules:
    - host: zizai-apollo-client-test.test.thinkinpower.net
      http:
        paths:
          - path: /
            backend:
              serviceName: service-apollo-meta-server-test-alpha
              servicePort: 8080
---
apiVersion: extensions/v1beta1
kind: Ingress
metadata:
  name: zizai-apollo-client-prod
  namespace: zizai

spec:
  rules:
    - host: zizai-apollo-client-prod.test.thinkinpower.net
      http:
        paths:
          - path: /
            backend:
              serviceName: service-apollo-meta-server-prod
              servicePort: 8080
依次创建就可以。创建成功如下:
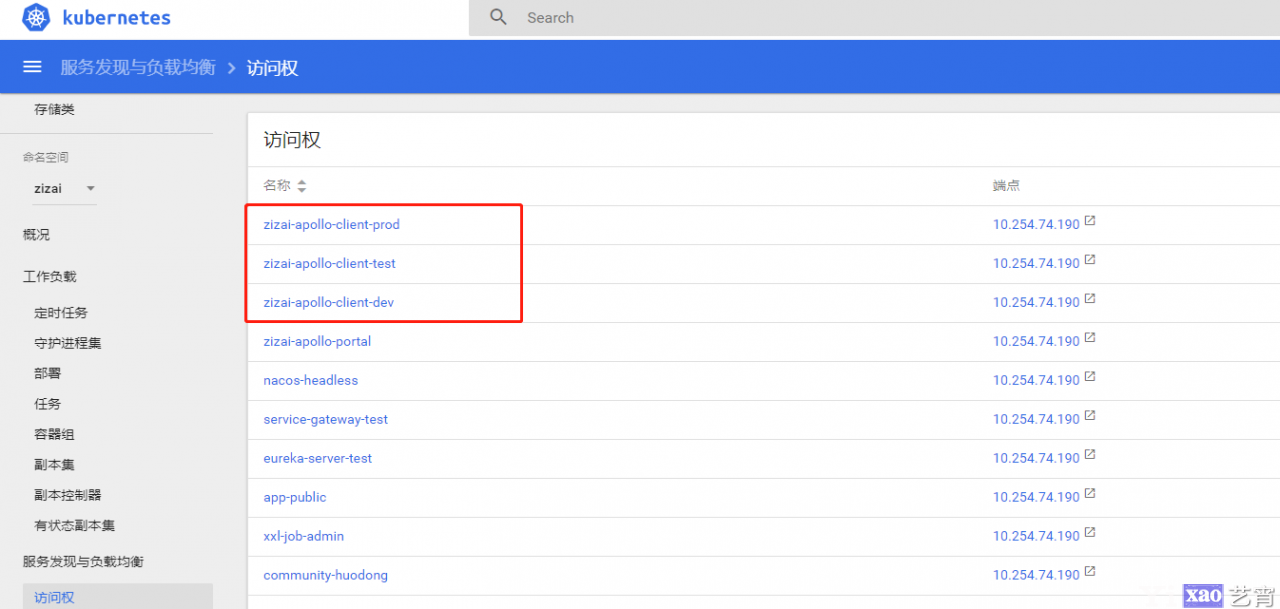
config创建ingress成功页面
二、配置Ingress域名nginx配置
Ingress配置了域名,要从外面访问入去,我们用nginx进行了转发。配置如下:
//zizai-apollo-client-dev.test.thinkinpower.net.conf

server {
  listen     80;
  server_name  zizai-apollo-client-dev.test.thinkinpower.net;
  access_log  /data/logs/nginx/zizai-apollo-client-dev.test.thinkinpower.net.access.log  main;
  error_log  /data/logs/nginx/zizai-apollo-client-dev.test.thinkinpower.net.error.log;
  root   /data/webapps/zizai-apollo-client-dev.test.thinkinpower.net/test/static;
  index  index.html index.htm;
  client_max_body_size 50m;


  location   / {
    proxy_set_header Host $http_host;
    proxy_set_header X-Real-IP $remote_addr;
    proxy_set_header X-Forwarded-For $proxy_add_x_forwarded_for;
    proxy_pass http://kubernetes;  # 指向集群的
  }

}

//zizai-apollo-client-test.test.thinkinpower.net.conf

server {
  listen     80;
  server_name  zizai-apollo-client-test.test.thinkinpower.net;
  access_log  /data/logs/nginx/zizai-apollo-client-test.test.thinkinpower.net.access.log  main;
  error_log  /data/logs/nginx/zizai-apollo-client-test.test.thinkinpower.net.error.log;
  root   /data/webapps/zizai-apollo-client-test.test.thinkinpower.net/test/static;
  index  index.html index.htm;
  client_max_body_size 50m;


  location   / {
    proxy_set_header Host $http_host;
    proxy_set_header X-Real-IP $remote_addr;
    proxy_set_header X-Forwarded-For $proxy_add_x_forwarded_for;
    proxy_pass http://kubernetes;  # 指向集群的
  }

}

//zizai-apollo-client-prod.test.thinkinpower.net.conf

server {
  listen     80;
  server_name  zizai-apollo-client-prod.test.thinkinpower.net;
  access_log  /data/logs/nginx/zizai-apollo-client-prod.test.thinkinpower.net.access.log  main;
  error_log  /data/logs/nginx/zizai-apollo-client-prod.test.thinkinpower.net.error.log;
  root   /data/webapps/zizai-apollo-client-prod.test.thinkinpower.net/test/static;
  index  index.html index.htm;
  client_max_body_size 50m;


  location   / {
    proxy_set_header Host $http_host;
    proxy_set_header X-Real-IP $remote_addr;
    proxy_set_header X-Forwarded-For $proxy_add_x_forwarded_for;
    proxy_pass http://kubernetes;  # 指向集群的
  }

}
这样就可以在外面访问了。可以通过域名直接访问了看注册中心Eureka,例如:我的开发环境为如下图所示:
打开
zizai-apollo-client-dev.test.thinkinpower.net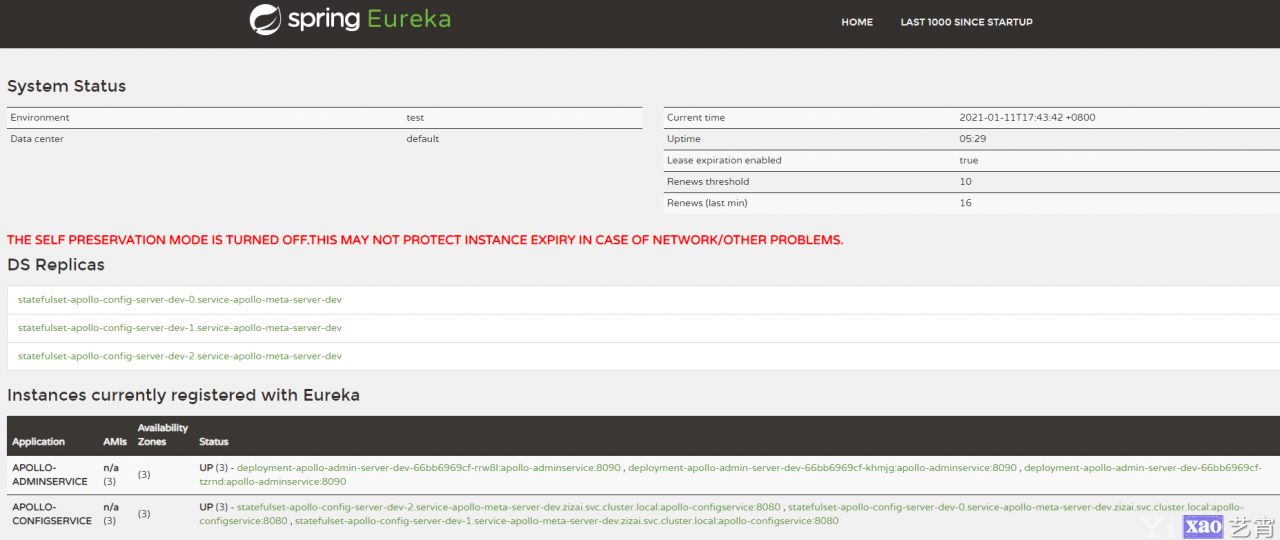
三、创建springboot项目
下面创建一个springboot项目进行访问apollo的键值。
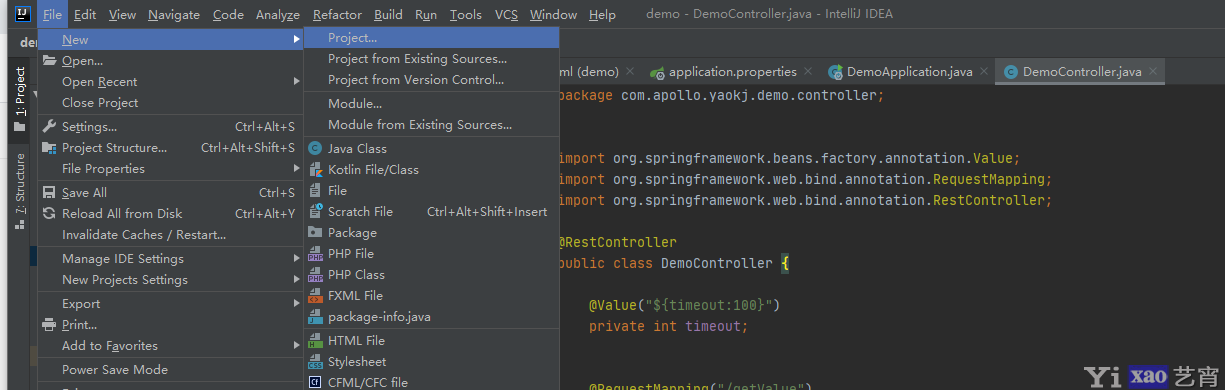
1、用idea创建一个springboot项目
(1)新建项目
(2)如下图选择项目
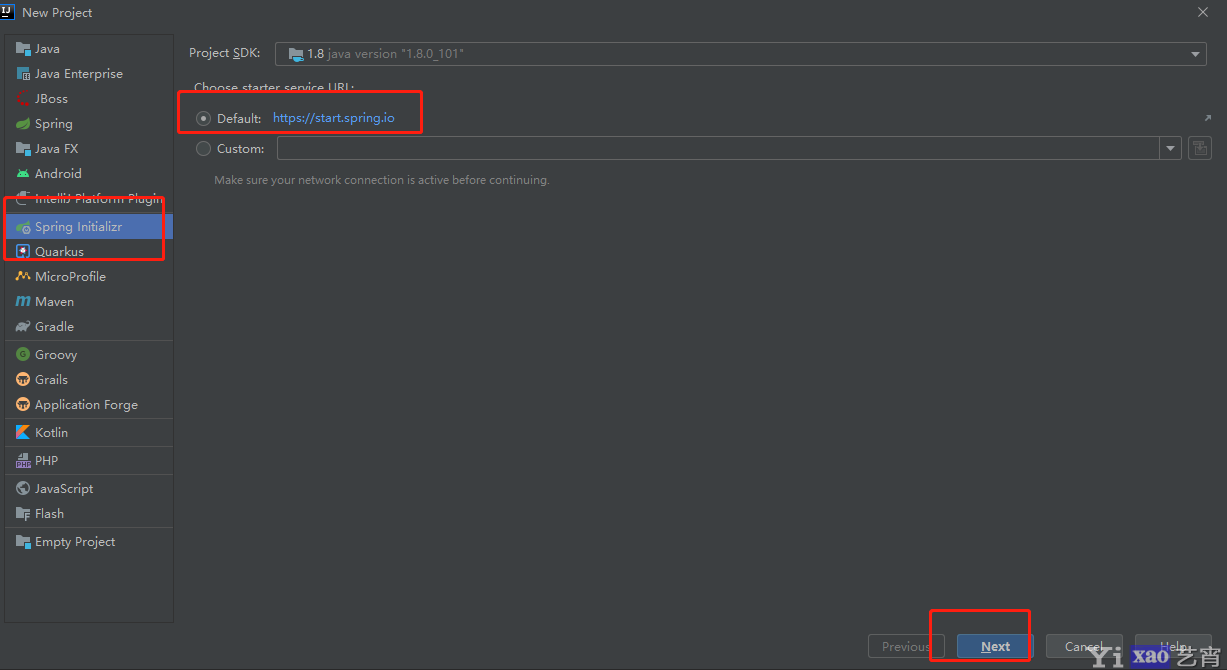
再下一步,选择jdk8
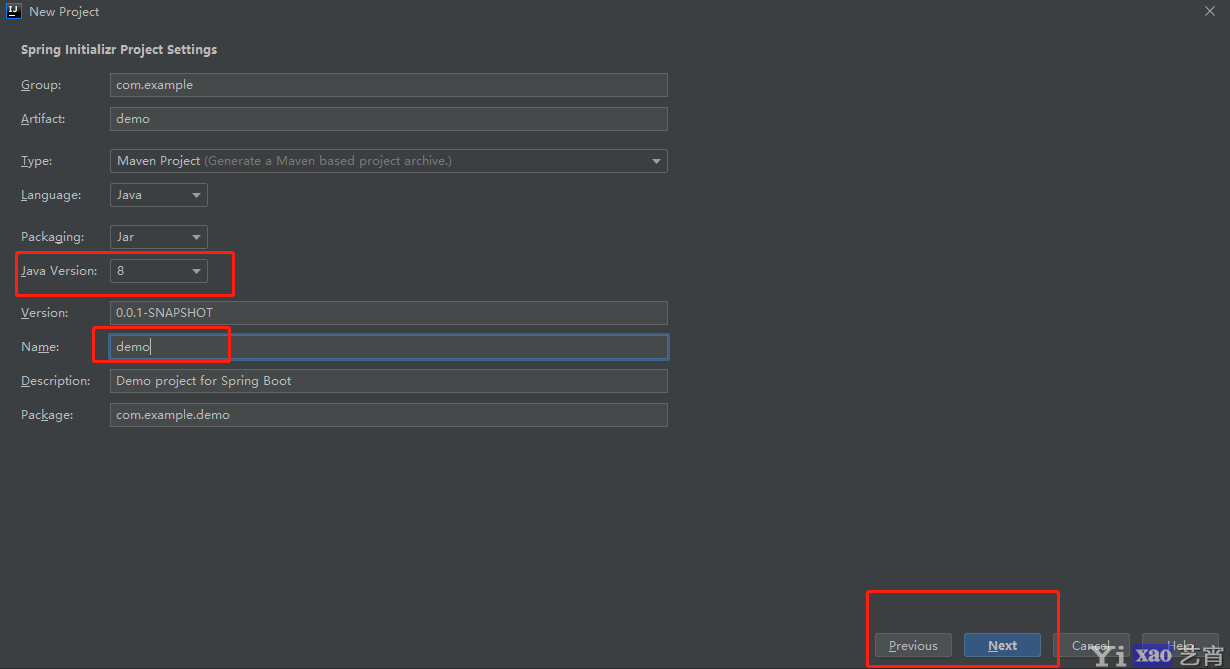
再下一步,就可以完成项目的创建

(3)引入maven包
可以进入https://mvnrepository.com/,进行搜索。本文软件包的链接为:
https://mvnrepository.com/artifact/com.ctrip.framework.apollo/apollo-client/1.7.0本文用的是最新的版本。
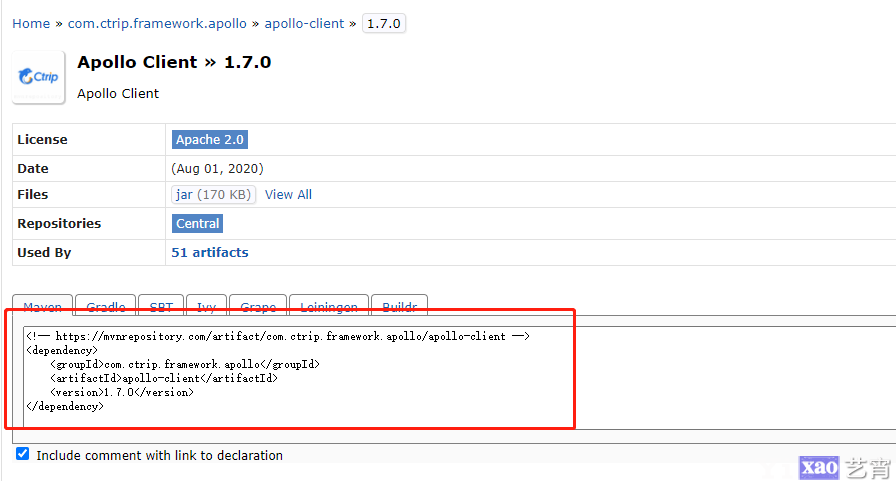
如下放入maven的文件即可以。
 <dependency>
            <groupId>com.ctrip.framework.apollogroupId>
            <artifactId>apollo-clientartifactId>
            <version>1.7.0version>
  dependency>
具体的pom.xml为:
<project xmlns="http://maven.apache.org/POM/4.0.0" xmlns:xsi="http://www.w3.org/2001/XMLSchema-instance"
         xsi:schemaLocation="http://maven.apache.org/POM/4.0.0 https://maven.apache.org/xsd/maven-4.0.0.xsd">
    <modelVersion>4.0.0modelVersion>
    <parent>
        <groupId>org.springframework.bootgroupId>
        <artifactId>spring-boot-starter-parentartifactId>
        <version>2.4.1version>
        <relativePath/>
    parent>
    <groupId>com.apollo.yaokjgroupId>
    <artifactId>demoartifactId>
    <version>0.0.1-SNAPSHOTversion>
    <name>demoname>
    <description>Demo project for Spring Bootdescription>

    <properties>
        <java.version>1.8java.version>
    properties>

    <dependencies>
        <dependency>
            <groupId>org.springframework.bootgroupId>
            <artifactId>spring-boot-starter-webartifactId>
        dependency>

        <dependency>
            <groupId>org.springframework.bootgroupId>
            <artifactId>spring-boot-starter-testartifactId>
            <scope>testscope>
        dependency>
        <dependency>
            <groupId>com.ctrip.framework.apollogroupId>
            <artifactId>apollo-clientartifactId>
            <version>1.7.0version>
        dependency>

    dependencies>

    <build>
        <plugins>
            <plugin>
                <groupId>org.springframework.bootgroupId>
                <artifactId>spring-boot-maven-pluginartifactId>
            plugin>
        plugins>
    build>

project>
(4)创建controller文件
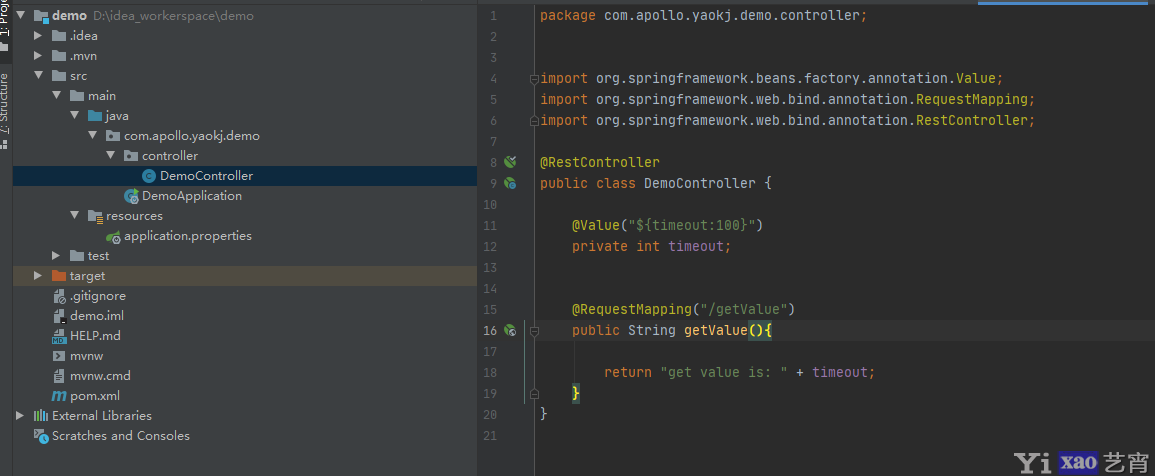
import org.springframework.beans.factory.annotation.Value;
import org.springframework.web.bind.annotation.RequestMapping;
import org.springframework.web.bind.annotation.RestController;

@RestController
public class DemoController {

    @Value("${timeout:100}")
    private int timeout;


    @RequestMapping("/getValue")
    public String getValue(){

        return "get value is: "   timeout;
    }
}
(5)修改application.properties文件

spring.application.name=demo
server.port=8989

#AppId是应用的身份信息,是配置中心获取配置的一个重要信息。
app.id=zizai-community-api
apollo.meta=zizai-apollo-client-dev.test.thinkinpower.net
#apollo.meta=zizai-apollo-client-test.test.thinkinpower.net
#apollo.meta=zizai-apollo-client-prod.test.thinkinpower.net
#在应用启动阶段,向Spring容器注入被托管的application.properties文件的配置信息。
apollo.bootstrap.enabled=true
#将Apollo配置加载提到初始化日志系统之前。
apollo.bootstrap.eagerLoad.enabled=true
#调整 controller 包的 log 级别,为了后面演示在配置中心动态配置日志级别。
logging.level.com.gf.controller=debug

# 指定apollo配置缓冲路径,默认为 linux: /opt/data/{appId}/config-cache Windows: C:\opt\data\{appId}\config-cache
# apollo.cacheDir=/opt/data/some-cache-dir

#设置集群
#apollo.cluster=SomeCluster
#设置apollo里的namespace,
#apollo.bootstrap.namespaces: application
具体的选项看里面的注释。
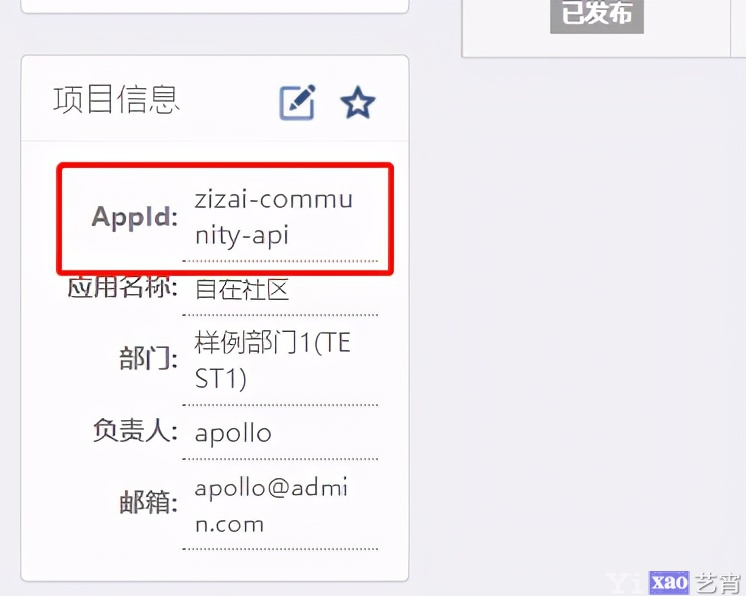
注意:app.id=zizai-community-api里的值和portal里面的应用id必须一致。apollo.meta=zizai-apollo-client-dev.test.thinkinpower.net的值为config里的访问链接。
如:
和下面的是一致的

(6)环境配置
因为本文的apollo是部署在k8s的,在用Idea测试的时候必须要配置下面2个变量,不然会失败,获取不到值。
env: 应用使用 Apollo 哪个环境,设置为 DEV 为开发环境,设置为 PROD 是生产环境。
apollo.configService: 配置中心的地址,在本地Idea跑代码时,指定 meta 地址无效。因为 Apollo 是部署在 k8s 中,需要在启动时,将configService 和 meta 的值保持一致。
所以在Idea启动的时候,如果是开发环境要加上:
-Dapollo.configService=http://zizai-apollo-client-dev.test.thinkinpower.net -Denv=DEV如果是 java 命令启动
$ java -Dapollo.configService=http://zizai-apollo-client-dev.test.thinkinpower.net -Denv=DEV -jar apollo-demo.jarIdea的配置如图:
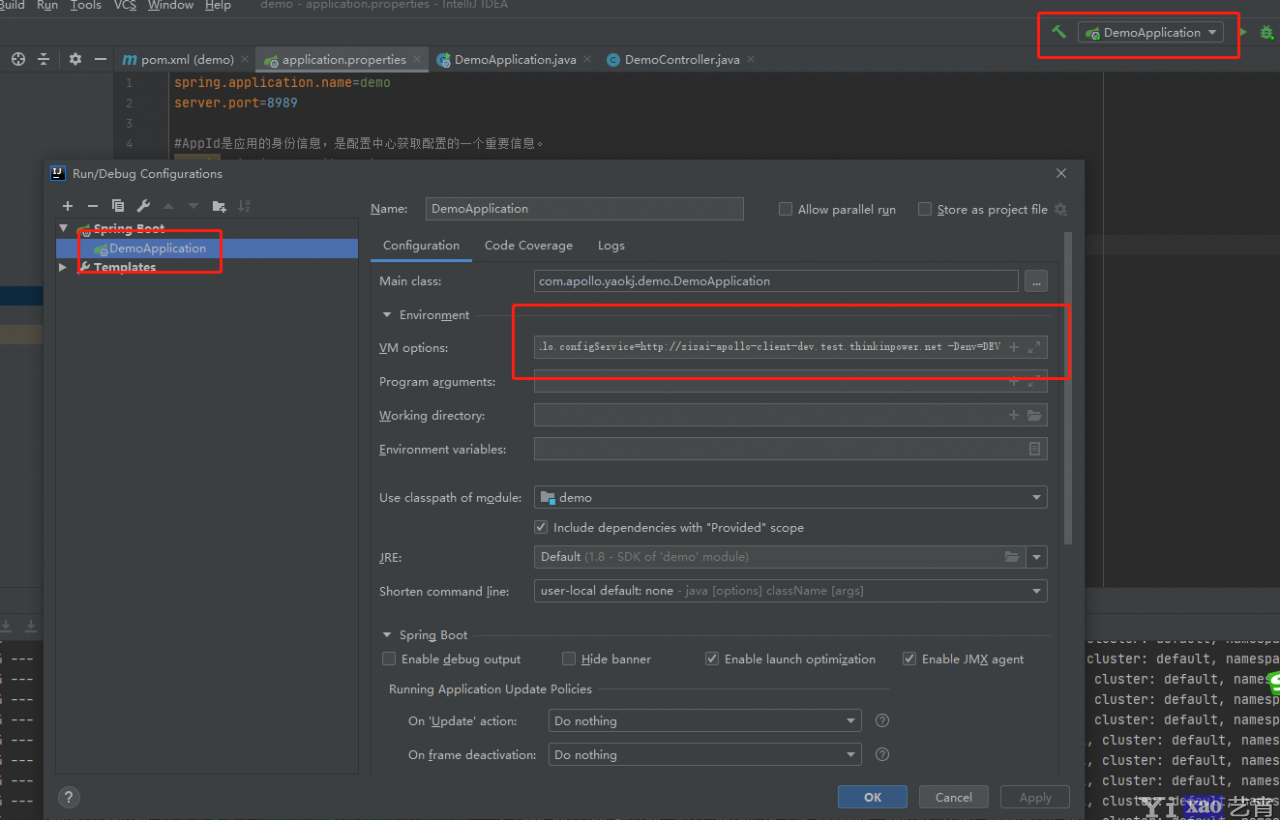
这样就可以拿到值了。
四、测试及演示
1、登录apollo的portal设置值

timeout设置为400。
2、启动springboot项目,访问值
(1)启动项目后,会看到拉配置中心的值

访问下面url获取值
http://localhost:8989/getValue返回:400,和portal里配置的一致

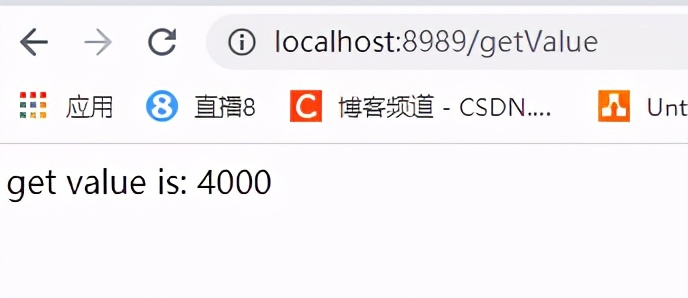
(2)修改timeout的值为4000

点击发布

可以看到项目日志,会获取到值

调接口,获取值为4000,和portal里配置的一致
切换环境的操作也是一样,不再详细说明。
五、源码
链接:https://pan.baidu.com/s/1zSDpslkwdLWwNXi4iRGHOg
提取码:ouuy
内容出处:,
声明:本网站所收集的部分公开资料来源于互联网,转载的目的在于传递更多信息及用于网络分享,并不代表本站赞同其观点和对其真实性负责,也不构成任何其他建议。如果您发现网站上有侵犯您的知识产权的作品,请与我们取得联系,我们会及时修改或删除。文章链接:http://www.yixao.com/share/19742.html
 微信扫一扫
微信扫一扫
 支付宝扫一扫
相关推荐
-
Tippyjs–轻量的纯JavaScript动态提示工具插件库
介绍 Tippyjs轻量的纯 JavaScript 动态提示工具插件库。它提供了大量的不同悬停效果和超过 20 个可定制的选项。Tippy.js 是超级轻量的,具有相当不错的浏览器…
-
Naive Ui Admin正式发布
简介 Naive Ui Admin 是基于 vue3,vite2,TypeScript,搭配使用 Naive Ui 组件库形成一套开箱即用的中后台前端解决方案,Naive Ui A…
-
ASP.NET CORE 国产最火前后端完全分离框架BCVP
BCVP(Blog.Core&Vue Project)是.NET界开箱即用的企业级前后端分离【 .NET Core3.1 Api Vue 2.x RBAC】权限框架,是由国…
-
Nginx各版本与安装包详解
下载 官网下载地址:http://nginx.org/en/download.html 版本 版本一共分为三种: 1、Mainline version(开发版) 2、Stable …
-
GitHub 最全中华古诗词数据库
这是GitHub上最全中华古诗词数据库。根据介绍,chinese-poetry最全中华古诗词数据库集合了唐宋两朝近一万四千古诗人, 接近5.5万首唐诗加26万宋诗. 两宋时期156…
-
Ropper:一款功能强大的代码文件搜索和处理工具
关于Ropper Ropper是一款功能强大的代码文件搜索和处理工具,该工具能够帮助广大研究人员以不同的文件格式显示有关文件的信息,并查找用于构建不同体系结构(x86/x86_64…
-
同城APP系统v7.4新版本功能更新升级清单
创实互联的同城APP系统又双叒叕更新啦,为满足平台在运营过程中的新需求,不断提升用户体验,从平台开始研发至今,我们从未停止创新的脚步。同城APP系统v7.4版本已开始更新了。下面,…
-
2021年最新C++最全中文资源整理分享
很多程序员应该记得 GitHub 上有一个 Awesome – XXX 系列的资源整理。awesome-cpp 就是 fffaraz 发起维护的 C 资源列表,内容包括…
-
瑞士免费网盘:Degoo
Degoo 是一家瑞士网盘服务商,注册即可免费获得105GB的储存空间,最高还可以免费扩容至608GB容量!不过有些限制,比如每90天访问一次帐户以保持上传的文件、每个文件的多个副…