1. 安装插件-RemoteDevelopment
这是一个组合插件,安装这个就意味着安装先的3个
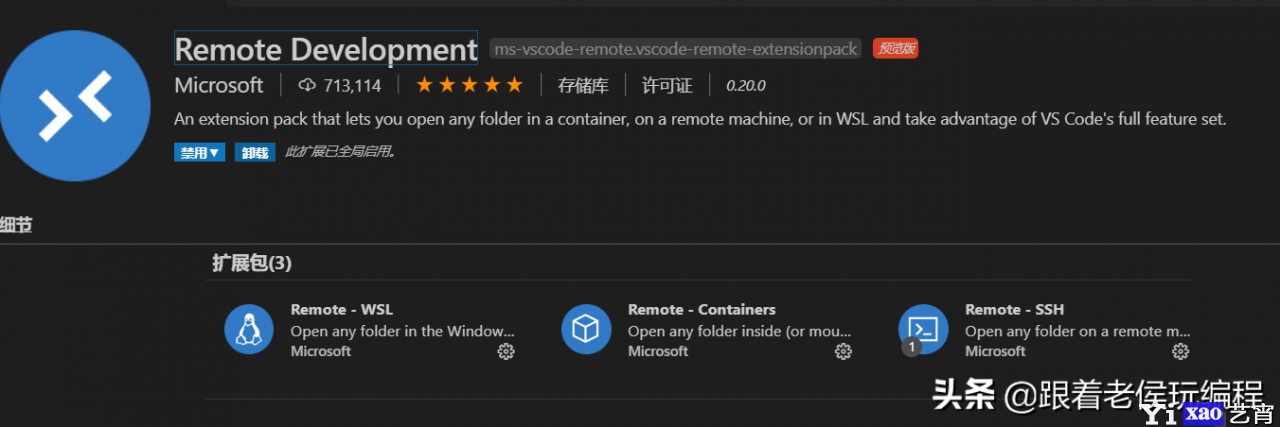

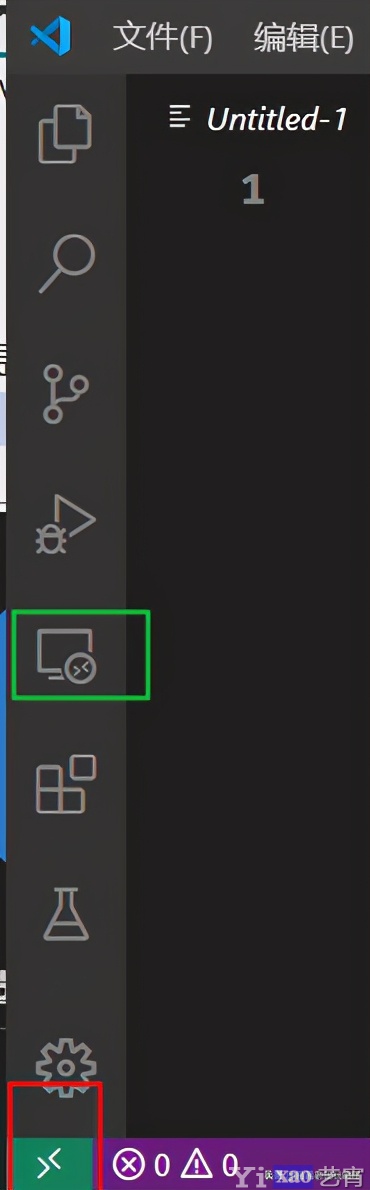
安装完成后会会在左侧多出一下几个图标
官方针对不同版本的Linux需要安装的依赖说明:https://code.visualstudio.com/docs/remote/linux
2. Centos依赖安装
每个人的机器环境不同,所以需要先检查一下当前软件安装情况
- 首先备份原来的cent os官方yum源
cp /etc/yum.repos.d/CentOS-Base.repo /etc/yum.repos.d/CentOS-Base.repo.bak
- 获取阿里的yum源覆盖本地官方yum源
wget -O /etc/yum.repos.d/CentOS-Base.repo http://mirrors.aliyun.com/repo/Centos-6.repo- 清理yum缓存,并生成新的缓存
yum clean all
yum makecache
2.1. 查看是否安装了某个软件
rpm包安装的可以用rpm -qa看到,如果要查找某软件包是否安装,用 rpm -qa | 软件或者包的名字
deb包安装的可以用dpkg -l能看到。如果是查找指定软件包,用dpkg -l | grep 软件或者包的名字
yum方法安装的可以用yum list installed查找,如果是查找指定包,yum list installed | grep 软件名或者包名
2.2. 卸载依赖
我在安装的时候gcc的已经存在反复试了几次都没有办法安装,只好卸载原有依赖
# 强制卸载
rpm -e --nodeps  gcc-c  -4.4.7-23.el6.x86_64
2.3. 重新安装
直接从VScode官方文档复制代码即可,我的使用环境是CentOS6.5,其他版本需要参考VScode官方文档
# Update glibc and static libs
wget http://copr-be.cloud.fedoraproject.org/results/mosquito/myrepo-el6/epel-6-x86_64/glibc-2.17-55.fc20/glibc-2.17-55.el6.x86_64.rpm
wget http://copr-be.cloud.fedoraproject.org/results/mosquito/myrepo-el6/epel-6-x86_64/glibc-2.17-55.fc20/glibc-common-2.17-55.el6.x86_64.rpm
wget http://copr-be.cloud.fedoraproject.org/results/mosquito/myrepo-el6/epel-6-x86_64/glibc-2.17-55.fc20/glibc-devel-2.17-55.el6.x86_64.rpm
wget http://copr-be.cloud.fedoraproject.org/results/mosquito/myrepo-el6/epel-6-x86_64/glibc-2.17-55.fc20/glibc-headers-2.17-55.el6.x86_64.rpm
wget https://copr-be.cloud.fedoraproject.org/results/mosquito/myrepo-el6/epel-6-x86_64/glibc-2.17-55.fc20/glibc-utils-2.17-55.el6.x86_64.rpm
wget https://copr-be.cloud.fedoraproject.org/results/mosquito/myrepo-el6/epel-6-x86_64/glibc-2.17-55.fc20/glibc-static-2.17-55.el6.x86_64.rpm
sudo rpm -Uh --force --nodeps \
    glibc-2.17-55.el6.x86_64.rpm \
    glibc-common-2.17-55.el6.x86_64.rpm \
    glibc-devel-2.17-55.el6.x86_64.rpm \
    glibc-headers-2.17-55.el6.x86_64.rpm \
    glibc-static-2.17-55.el6.x86_64.rpm \
    glibc-utils-2.17-55.el6.x86_64.rpm

# Update libstdc
wget https://copr-be.cloud.fedoraproject.org/results/mosquito/myrepo-el6/epel-6-x86_64/gcc-4.8.2-16.3.fc20/libstdc  -4.8.2-16.3.el6.x86_64.rpm
wget  https://copr-be.cloud.fedoraproject.org/results/mosquito/myrepo-el6/epel-6-x86_64/gcc-4.8.2-16.3.fc20/libstdc  -devel-4.8.2-16.3.el6.x86_64.rpm
wget https://copr-be.cloud.fedoraproject.org/results/mosquito/myrepo-el6/epel-6-x86_64/gcc-4.8.2-16.3.fc20/libstdc  -static-4.8.2-16.3.el6.x86_64.rpm
sudo rpm -Uh \
    libstdc  -4.8.2-16.3.el6.x86_64.rpm \
    libstdc  -devel-4.8.2-16.3.el6.x86_64.rpm \
    libstdc  -static-4.8.2-16.3.el6.x86_64.rpm
命令中包含两部分,一部分利用wget下载,另一部分为安装
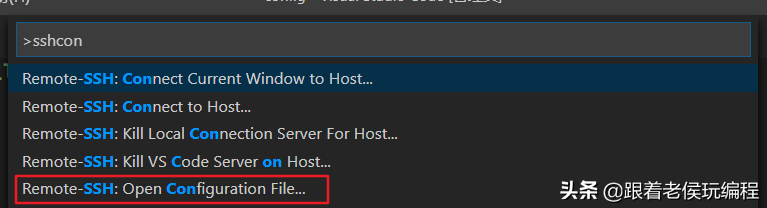
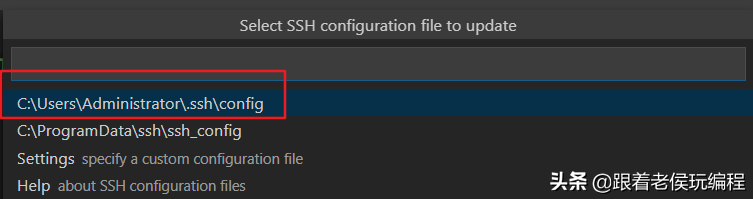
3. 配置远程服务器信息
按快捷键Ctrl Shift p,输入sshconfig 选择对应的配置文件
编写配置信息,手上没有多台虚拟机这里利用一台模拟两台
# Read more about SSH config files: https://linux.die.net/man/5/ssh_config
Host hadoop101
    HostName 192.168.149.101
    User root
Host hadoop102
    HostName 192.168.149.101
    User root
4. 免密码登录配置
这一步需要安装一下Git,然后利用git生成SSH的公私钥文件,具体命令:ssh-keygen,然后一路回车
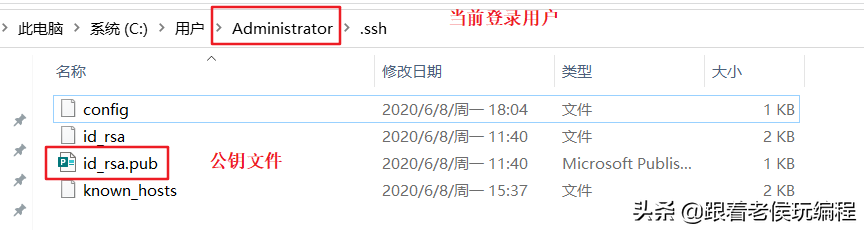
在公钥文件所在的目录执行以下命令
#将当前目录的公钥加入远程服务器的认证文件中
ssh-copy-id -i ./id_rsa.pub root@192.168.149.101
至此全部配置完成,可以愉快地玩耍了
内容出处:,
声明:本网站所收集的部分公开资料来源于互联网,转载的目的在于传递更多信息及用于网络分享,并不代表本站赞同其观点和对其真实性负责,也不构成任何其他建议。如果您发现网站上有侵犯您的知识产权的作品,请与我们取得联系,我们会及时修改或删除。文章链接:http://www.yixao.com/tech/16754.html
 微信扫一扫
微信扫一扫
 支付宝扫一扫
相关推荐
-
Springboot+Websocket实现的在线聊天及聊天室系统
今天发布的是一款由springboot+freemark+websocket+MySQL实现的Java web在线聊天系统,主要实现的功能涉及的知识点有:springboot框架原…
-
最简单的生成ios证书的方法
当我们使用hbuilder等H5框架开发app的时候,我们需要ios证书才能将app工程编译成ipa文件。 但是苹果官方提供的生成ios证书的方法,只能使用mac电脑,假如我们没有…
-
营销型网站建设需要遵循的基本原则
营销型网站,这种网站类型在我们网络上其实占有一个很大的比例的,这种网站一般是会为用户提供一些营销的一些服务的,上面所涉及到的内容也是跟你说内容有关联的,那么我们在做营销型的网站的建…
-
sagacity-sqltoy睿智ORM框架5.0.2、4.18.28 发版
开源地址: github: https://github.com/sagframe/sagacity-sqltoy gitee: https://gitee.com/sagacit…
-
JeecgBoot 3.4.2 版本发布,Vue3版本大升级
项目介绍 JeecgBoot是一款企业级的低代码平台!前后端分离架构 SpringBoot2.x,SpringCloud,Ant Design&Vue,Mybatis-pl…
-
DEBIAN设置VIM字体高亮显示、行号、缩进
在vps上编辑文本时如何让字体高亮显示呢,当我们安装了vim后只需要修改vimrc文件即可。在debian中vim的配置文件存放在/etc/vim目录中,配置文件名为vimrc。在…
-
数据分析工具PyMiner-py2cn v1.0.2-alpha发布
PyMiner一款基于数据工作空间的数学工具,通过加载插件的方式实现不同的需求,用易于操作的形式完成数学计算相关工作。 PyMiner-py2cn v1.0.2-alpha 已经发…
-
不调整Nginx,SpringBoot也能解决前端访问的跨域问题
1、什么情况下会出现跨域问题 通常,在前端工程师的开发过程中,往往在本地机器启动前端服务, 而调用的后端接口服务是在另外一台机器运行,这时就会出现跨域问题,让接口无法调通。 而到了…
-
Mac新系统Big Sur为我们带来了什么惊喜?
前几天,苹果正式推出了全新的Mac系统:Big Sur。那么此次苹果进行更新的这款新系统到底是有了哪些改变呢?我们一起来看看吧! 首先是同过去几代拟物的图标相比,Big Sur上的…
-
SpringBoot+Vue实现网页版人脸登录、人脸识别,逼格很高!
介绍 FACE-UI 基于前后端分离Web端项目,主要实现了网页版的人脸登录,通过调取前端摄像头拍照,传入后台进行跟数据库人脸库的相似度比对。 技术点:Springboot,Mys…