Netty是个很强大的框架,但是网络开发本就是一件比较复杂的事情,接下来我会用Netty做一些简单的应用出来,通过这些应用会让Netty更加容易理解一些。
(一)什么是netty
Netty是一个异步的,基于事件驱动的网络应用框架,用于快速开发可维护、高性能的网络服务器和客户端。Netty的应用十分广泛,可以说主流的框架中,如果有网络方面的需求,一般用的都是netty框架。比如Dubbo、ES、Zookeeper中都用到了Netty。因此即使在平常工作中没有Netty的使用场景,Netty还是十分值得我们去学习的。
Netty底层基于NIO开发,其实大部分的Java程序员对于网络方面的开发能力是比较弱的,因此如果有网络相关的开发业务,如果自己通过BIO或者NIO实现,会产生很多问题。而通过Netty可以快速开发网络应用,因此也有人把Netty称为网络开发框架中的Spring。
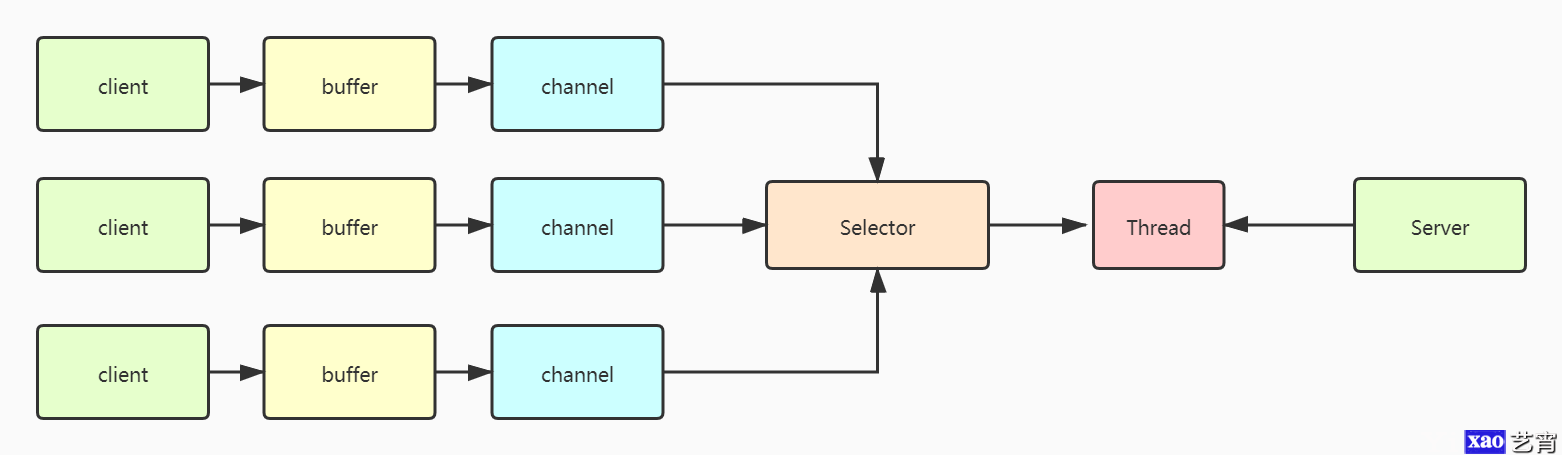
关于NIO和BIO的区别,我之前在博客中也讲到过,BIO每次通信都要新建一个线程去处理,NIO通过多路复用的方式去处理请求。下图就是NIO的处理流程。

(二)第一个netty入门程序
既然基于NIO开发,netty的入门程序和我们当时写的nio入门程序比较像,首先开发一个服务器端,netty的开发流程可以遵循一套规范:
1、通过ServerBootstrap启动,组装netty组件
2、组装eventLoopGroup
3、组装Channel
4、通过handler处理连接、读写请求
public class FirstServer {
    public static void main(String[] args) {
        // 1、服务器端的启动器,组装netty组件
        new ServerBootstrap()
                //2、组装eventLoop组
                .group(new NioEventLoopGroup())
                //3、选择服务器的ServerSocketChannel实现
                .channel(NioServerSocketChannel.class)
                //4、负责处理连接和读写
                .childHandler(new ChannelInitializer<NioSocketChannel>() {
                    @Override
                    protected void initChannel(NioSocketChannel nioSocketChannel) throws Exception {
                        //将bytebuffer转换为字符串
                        nioSocketChannel.pipeline().addLast(new StringDecoder());
                        //自定义handler,这里接收读事件后展示数据
                        nioSocketChannel.pipeline().addLast(new ChannelInboundHandlerAdapter(){
                            @Override
                            public void channelRead(ChannelHandlerContext ctx, Object msg) throws Exception {
                                System.out.println(msg);
                            }
                        });
                    }
                })
                //5、监听端口
                .bind(8080);
    }
}
复制代码
接着开发一个客户端,客户端的整体流程和服务器端十分类似:
1、通过Bootstrap启动,组装netty组件
2、组装eventLoopGroup
3、组装Channel
4、添加handler处理器
5、建立连接
6、发送数据到服务端
public class FirstClient {
    public static void main(String[] args) throws InterruptedException {
        //1、启动类
        new Bootstrap()
                //2、添加EventLoop组
                .group(new NioEventLoopGroup())
                //3、添加channel
                .channel(NioSocketChannel.class)
                //4、添加处理器
                .handler(new ChannelInitializer<NioSocketChannel>() {
                    @Override
                    protected void initChannel(NioSocketChannel nioSocketChannel) throws Exception {
                        //将发送的内容encode编码
                        nioSocketChannel.pipeline().addLast(new StringEncoder());
                    }
                })
                //5、连接到服务器
                .connect(new InetSocketAddress("localhost",8080))
                .sync()
                .channel()
                //6、发送数据
                .writeAndFlush("hello");
    }
}
复制代码
启动服务器端后再启动客户端,可以发现服务端接受到了客户端发过来的信息。看到这里觉得还是有点蒙没关系,下面会对每个组件进行讲解。
(三)理解Netty中的组件
3.1 EventLoop
EventLoop其实是一个单线程的执行器,同时维护了一个Selector,EventLoop的作用是处理Channel上的io事件。
3.2 EventLoopGroup
EventLoopGroup是一组EventLoop,Channel通常会调用EventLoopGroup中的register方法绑定其中的一个EventLoop,后续这个channel中的io事件则都由这个EventLoop处理。
3.3 channel
channel是一个数据的传输流,channel可以理解为是通讯的载体。
3.4 ChannelHandler
ChannelHandler是用来处理Channel上的各种事件的,所有的ChannelHandler连起来就是pipeline。简单来讲,channel是数据的传输通道,而ChannelHandler用来处理通道中的数据。
3.5 ByteBuf
ByteBuf是netty中数据的传输载体,网络数据的基本单位总是字节,ByteBuf用来传输这些网络上的字节。
(四)EventLoop
EventLoop可以处理多种任务,单独使用EventLoop可以通过下面几个步骤实现:
1、创建一个EventLoopGroup
2、从EventLoopGroup中获取EventLoop
3、通过EventLoop执行任务
通过代码这样表示:
public class TestEventLoop {
    public static void main(String[] args) {
        //1、创建事件循环组
        //NioEventLoopGroup可以处理IO事件、普通任务、定时任务
        EventLoopGroup group=new NioEventLoopGroup();
        //2、获取下一个事件循环对象
        EventLoop eventLoop = group.next();
        //3、执行普通任务
        eventLoop.execute(()->{
            System.out.println("普通任务");
        });
        //4、执行定时任务
        eventLoop.scheduleAtFixedRate(()->{
            System.out.println("定时任务");
        },0,1, TimeUnit.SECONDS);
    }
}
复制代码EventLoop最常用的就是执行IO任务了,我们在入门程序中写的group(new NioEventLoopGroup())就是把EventLoop用来处理IO任务。
在netty中,我们还会在绑定group时指定boss和work,boss用来处理连接,work用来处理收到读写请求后续的操作,有的时候我们还可以自定义EventLoopGroup处理其他任务,因此前面的FirstServer 可以写成下面这样:
public class NioServer {
    public static void main(String[] args) {
        //boss用来处理连接
        NioEventLoopGroup bossGroup = new NioEventLoopGroup();
        //work用来处理读写请求
        NioEventLoopGroup workGroup = new NioEventLoopGroup();
        //otherGroup处理普通任务,比如打印一段内容
        EventLoopGroup otherGroup=new DefaultEventLoop();

        new ServerBootstrap()
                .group(bossGroup,workGroup)
                .channel(NioServerSocketChannel.class)
                .childHandler(new ChannelInitializer<NioSocketChannel>() {
                    @Override
                    protected void initChannel(NioSocketChannel nioSocketChannel) throws Exception {
                        nioSocketChannel.pipeline().addLast(new ChannelInboundHandlerAdapter(){
                            @Override
                            public void channelRead(ChannelHandlerContext ctx, Object msg) throws Exception {
                                ByteBuf byteBuf = (ByteBuf) msg;
                                System.out.println(byteBuf.toString());
                                ctx.fireChannelRead(msg); //将msg传给下一个处理者
                            }
                        })
                        .addLast(otherGroup,"handler",new ChannelInboundHandlerAdapter(){
                            @Override
                            public void channelRead(ChannelHandlerContext ctx, Object msg) throws Exception {
                                ByteBuf byteBuf = (ByteBuf) msg;
                                System.out.println(byteBuf.toString());
                            }
                        });
                    }
                }).bind(8080);
    }
}
复制代码
(五)Channel
Channel中有几个常用的方法:
close() 关闭channel
pipeline() 添加处理器
write() 将数据写入到缓冲区
flush() 将数据刷出,也就是发给服务端
writeAndFlush() 将数据写入并刷出
复制代码
我们通过入门案例的客户端代码讲解Channel
5.1 channel的连接
public class NioClient  {
    public static void main(String[] args) throws InterruptedException {
        ChannelFuture channelFuture = new Bootstrap()
                .group(new NioEventLoopGroup())
                .channel(NioSocketChannel.class)
                .handler(new ChannelInitializer<NioSocketChannel>() {
                    @Override
                    protected void initChannel(NioSocketChannel nioSocketChannel) throws Exception {
                        nioSocketChannel.pipeline().addLast(new StringEncoder());
                    }
                })
                //connect是一个异步调用的过程,因此必须要使用sync方法等待连接建立
                .connect(new InetSocketAddress("localhost", 8080));
        //1、使用sync方法阻塞线程直到连接建立
        channelFuture.sync();
        channelFuture.channel().writeAndFlush("hello,world");
    }
}
复制代码
整个流程这里就不介绍了,主要介绍里面的一个方法 channelFuture.sync(); 当调用connect方法建立连接时,这个connect方法其实是一个异步的方法,因此如果不加 channelFuture.sync()方法等待连接建立,是无法获取到连接后的channel的,更别提写入数据了。
除了使用sync等待连接,还可以采用设置监听器的方式获取channelFuture
public static void main(String[] args) throws InterruptedException {
    ChannelFuture channelFuture = new Bootstrap()
            .group(new NioEventLoopGroup())
            .channel(NioSocketChannel.class)
            .handler(new ChannelInitializer<NioSocketChannel>() {
                @Override
                protected void initChannel(NioSocketChannel nioSocketChannel) throws Exception {
                    nioSocketChannel.pipeline().addLast(new StringEncoder());
                }
            })
            //connect是一个异步调用的过程,因此必须要使用sync方法等待连接建立
            .connect(new InetSocketAddress("localhost", 8080));
    //2、使用addListener方法异步处理结果
    channelFuture.addListener(new ChannelFutureListener() {
        //在nio连接建立完毕之后,调用operationComplete方法
        @Override
        public void operationComplete(ChannelFuture channelFuture) throws Exception {
            Channel channel = channelFuture.channel();
            channel.writeAndFlush("hello,world");
        }
    });
}
复制代码
思路是一样的,等连接建立之后再处理对应的方法。
5.2 channel的关闭
除了连接是异步方法之外,channel的关闭方法也是异步的,因此也需要通过
同步阻塞的方式等待关闭:
Channel channel = channelFuture.channel();
ChannelFuture closeFuture = channel.closeFuture();
System.out.println("等待关闭中");
//当其他线程关闭了channel,sync同步等待
closeFuture.sync();
System.out.println("连接已关闭");
复制代码
同样也可以采用监听器回调的方式:
Channel channel = channelFuture.channel();
ChannelFuture closeFuture = channel.closeFuture();
closeFuture.addListener(new ChannelFutureListener() {
    @Override
    public void operationComplete(ChannelFuture channelFuture) throws Exception {
        System.out.println("连接已关闭");
    }
});
复制代码
(六)ChannelHandler
ChannelHandler是用来处理Channel上的各种事件的,handler分为inbound和outbount两种,所有的ChannelHandler连起来就是pipeline。
ChannelInboundHandlerAdapter的子类主要用来读取客户端数据,写回结果。
ChannelOutboundHandlerAdapter的字类主要对写回结果进行加工。
关于handler和pipeline的代码在前面的例子中都有写
public static void main(String[] args) {
    new ServerBootstrap()
            .group(new NioEventLoopGroup())
            .channel(NioServerSocketChannel.class)
            .childHandler(new ChannelInitializer<NioSocketChannel>() {
                @Override
                protected void initChannel(NioSocketChannel nioSocketChannel) throws Exception {
                     //1、从channel中获取到pipeline
                     ChannelPipeline pipeline = nioSocketChannel.pipeline();
                     //2、添加handler处理器到pipeline
                    pipeline.addLast(new ChannelInboundHandlerAdapter(){
                        @Override
                        public void channelRead(ChannelHandlerContext ctx, Object msg) throws Exception {
                            ByteBuf byteBuf = (ByteBuf) msg;
                            System.out.println(byteBuf.toString());
                            ctx.fireChannelRead(msg); //将msg传给下一个处理者
                        }
                    });
                    //3、添加多个表示依次执行
                    pipeline.addLast(new ChannelInboundHandlerAdapter(){
                        @Override
                        public void channelRead(ChannelHandlerContext ctx, Object msg) throws Exception {
                            ByteBuf byteBuf = (ByteBuf) msg;
                            System.out.println(byteBuf.toString());
                        }
                    });
                }
            }).bind(8080);
复制代码
(七)ByteBuf
netty中的ByteBuf比JDK自带的ByteBuffer对字节数据的操作更加友好,也更加强大。ByteBuf的主要优势有几下几点:
1、支持自动扩容
2、支持池化技术,可以重用实例,节约内存
3、读写指针分离
4、很多方法体现了零拷贝,比如slice、duplicate等
接下来通过一些操作带你来了解ByteBuf。
1、自动扩容
创建一个默认的ByteBuf,初始容量是256,写入一系列数据之后,这个容量会随着数据的增大自动扩容。
public static void main(String[] args) {
    ByteBuf buf= ByteBufAllocator.DEFAULT.buffer();
    System.out.println(buf);
    StringBuilder stringBuilder=new StringBuilder();
    for (int i = 0; i < 500; i++) {
        stringBuilder.append("1");
    }
    buf.writeBytes(stringBuilder.toString().getBytes());
    System.out.println(buf);
}
复制代码
结果:
PooledUnsafeDirectByteBuf(ridx: 0, widx: 0, cap: 256)
PooledUnsafeDirectByteBuf(ridx: 0, widx: 500, cap: 512)
复制代码
ByteBuf的扩容规则如下:
如果数据大小没有超过512,每次扩容到16的整数倍
如果数据大小超过512,则扩容到下一个2^n次
扩容不能超过max capacity
2、直接内存和堆内存
ByteBuf支持创建基于直接内存的ByteBuf,也支持创建基于堆内存的ByteBuf。两者的差距在于:
堆内存的分配效率较高,但是读写性能相对比较低。
直接内存的分配效率比较低,但是读写性能较高(少一次内存复制)
netty默认使用直接内存作为创建ByteBuf的方式
ByteBufAllocator.DEFAULT.heapBuffer();
ByteBufAllocator.DEFAULT.directBuffer();
复制代码
3、池化技术
ByteBuf支持池化技术,所谓池化指的是ByteBuf创建出来后可以重用,节约内存。通过JVM参数开启或关闭netty的池化,默认开启状态:
-Dio.netty.allocator.type={unpooled|pooled}
复制代码
(八)总结
Netty是个很强大的框架,但是网络开发本就是一件比较复杂的事情,接下来我会用Netty做一些简单的应用出来,通过这些应用会让Netty更加容易理解一些。
内容出处:,
声明:本网站所收集的部分公开资料来源于互联网,转载的目的在于传递更多信息及用于网络分享,并不代表本站赞同其观点和对其真实性负责,也不构成任何其他建议。如果您发现网站上有侵犯您的知识产权的作品,请与我们取得联系,我们会及时修改或删除。文章链接:http://www.yixao.com/tech/25264.html
 微信扫一扫
微信扫一扫
 支付宝扫一扫
相关推荐
-
案例:如何成功建设开发出彩的服饰类网站
网站现在已经成为许多企业发展线上与线下相结合的一个重要转折点,而对于服装企业而言,建设这样的一个网站不仅仅能够符合企业的发展需求,而且要在企业的发展过程中不断的提高助力,这样才能算…
-
全面复盘懂球帝App运营策略
说到国民运动足球,话题和内容太多。联赛杯赛赛况、转会手笔、球员花边,甚至是足彩,这是一个略带狂热的全需求的产业链。球迷们在门户网站刷资讯、在贴吧里热评和互喷、在视频网站看直播、在彩…
-
阿里云服务器搭建网站全过程
由于之前搭建个人博客和个人网站使用的虚拟空间到期了,于是我干脆换成虚拟主机搭建博客和网站,正好阿里云有活动花了9.9买了半年的虚拟主机。 Z-BlogPHP是一款由PHP语言开发的…
-
Taro3.0.18发布
Taro 是一套遵循 React 语法规范的多端统一开发框架,支持用 React 的方式编写一次代码,生成能运行在微信小程序/百度智能小程序/支付宝小程序、H5 与 React N…
-
Win10应用商店切换地区的方法
用户从win7升级到了win10,也用上了win10系统中自带的应用商店。不过自带的应用商店显示的内容并不算多,而且内容还有区域限制,在中国开启应用商店默认只能够下载到中国区的内容…
-
Vestacp问题集合:SSL证书,HTTP/2,网站统计,在线文件管理和301重定向
自从用了WHMCS搭配Vestacp后,发现Cpanel确实也可以不需要再用了。其实我们建站用的功能并不多,虚拟主机管理面板只需要一个绑定域名、FTP文件管理、MysqL数据库管理…
-
轻量级流程图控件GoJS最新版本v2.1.35发布
GoJS是一款功能强大,快速且轻量级的流程图控件,可帮助你在JavaScript 和HTML5 Canvas程序中创建流程图,且极大地简化您的JavaScript / Canvas…
-
Spring发布新成员:Spring GraphQL!
GraphQL是一种用于API的查询语言,同时也是一个可以满足数据查询的语言。它对你API中的数据提供了一套易于理解的完整描述,这就使得客户端可以准确地获得它需要的数据,而且没有任何冗余,也让API更容易地随着时间推移而演进,还能用于构建强大的开发者工具。